

Explore charming paper crafts, create adorable love bug puppets, and discover delightful ways to express your affection. Embark on a journey of crafting joy as we guide you through projects designed to create memories that last a lifetime. Craft, share, and spread the love with our curated collection of heart-themed projects, perfect for making this Valentine's Day truly special. Let the crafting festivities begin, and let love be your inspiration!
Creating a heart-shaped paper chain is a simple and enjoyable craft. Follow these easy directions to make your own heart-shaped paper chain:
Materials Needed:
Instructions:
Gather Your Materials:
Collect colored construction paper in the desired colors for your heart-shaped paper chain.
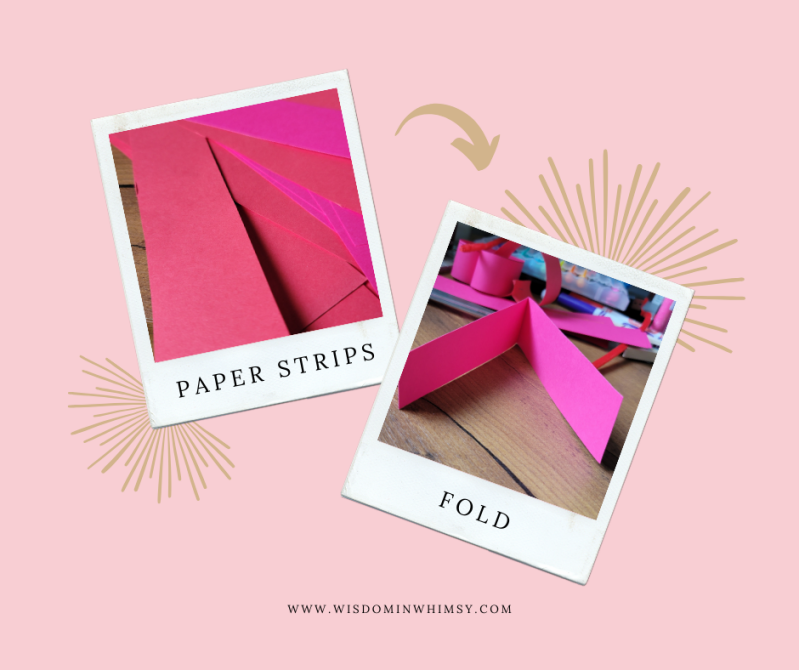
Prepare the Paper Strips:
Using a pencil, draw straight lines on the construction paper. The width of the strips depends on your preference, but a common size is around 1 to 1.5 inches.
Cut Out Strips:
Carefully cut along the pencil lines to create long strips of colored paper.
Fold the Strips:
Take one strip of paper and fold it in half, creating a crease at the midpoint.
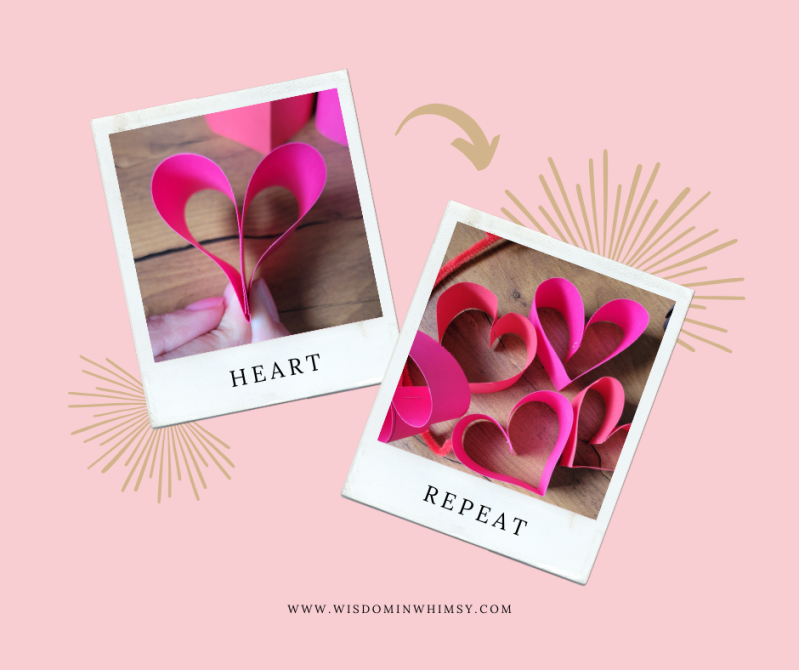
Shape the Heart:
Unfold the strip, and with the crease in the center, fold each end towards the crease to create a heart shape. The two ends should meet at the center crease, forming the bottom point of the heart.
Secure the Heart:
Apply a small amount of glue or tape to the overlapping ends of the strip to secure the heart shape. Press the ends together firmly.
Repeat the Process:
Repeat the process with additional strips of paper, creating as many hearts as you'd like for your paper chain.
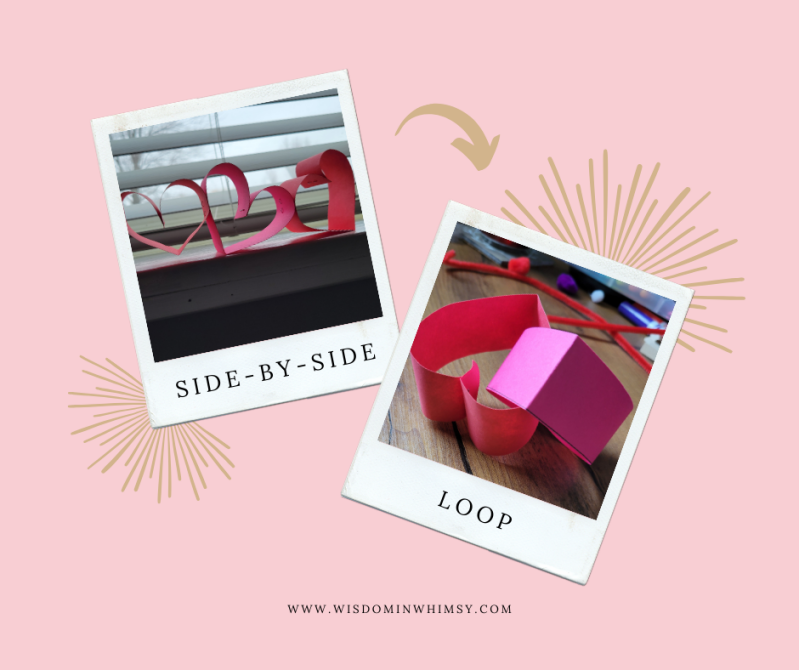
Connect the Hearts:
Take one heart and apply glue or tape to one side. Attach it to the next heart, overlapping slightly, and press them together to create a chain.
Continue Building the Chain:
Keep adding hearts to your chain, alternating colors or patterns if desired. Continue until you achieve the desired length for your heart-shaped paper chain.
Hang and Enjoy:
Once your heart-shaped paper chain is complete, hang it up as a festive decoration. You can string it across a room, doorway, or any other space to add a touch of love and creativity.
Now you have a beautiful heart-shaped paper chain to enhance your Valentine's Day celebrations!
Creating Love Bug Puppets is a delightful and imaginative craft that your family will enjoy. Follow these step-by-step directions to make your own adorable Love Bug Puppets:

Materials are a simple recommendation, but creativity knows no bounds. Instead of glue or tape, reach for a stapler. Swap craft sticks for clothespins. Let paper be just the beginning – stickers, markers, and glitter are your allies in this creative journey.
Instructions:
Gather Your Materials:
Collect all the materials needed for your Love Bug Puppets. Make sure you have a variety of colors for pom-poms, felt or construction paper, and pipe cleaners.
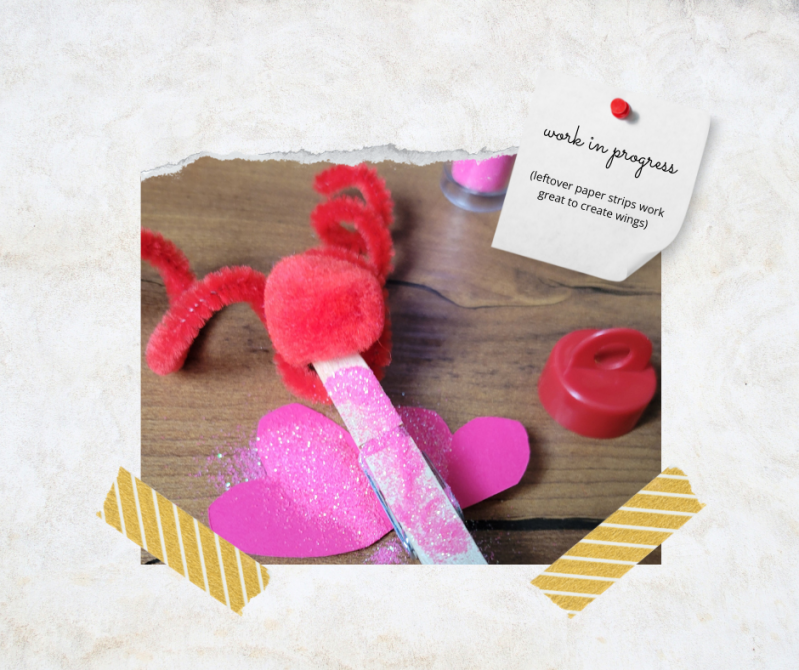
Create the Bug Body:
Select a craft stick as the puppet's body. This will be the base for your Love Bug.
Attach Pom-Pom Head:
Apply glue to one end of a colored pom-pom and attach it to the top of the craft stick to create the bug's head.
Add Googly Eyes:
Glue googly eyes onto the pom-pom to give your Love Bug character. You can experiment with different eye sizes for a whimsical touch.
Make Antennae:
Cut a pipe cleaner into two equal parts. Twist each piece into a coil shape to form the bug's antennae. Attach them to the top of the pom-pom.
Craft Wings:
Cut out wing shapes from colored felt or construction paper. Glue these to the sides of the craft stick, just below the pom-pom head.
Decorate the Bug:
Use markers or crayons to add facial features, patterns, or any other details to personalize your Love Bug.
Create Legs:
Cut small pieces of pipe cleaner to create bug legs. Attach these to the lower part of the craft stick, near the center.
Repeat the Process:
Repeat these steps to create additional Love Bug Puppets, experimenting with different colors and features for each one.
Let Dry:
Allow the glue to dry completely before playing with or displaying your Love Bug Puppets.
Enjoy the process of making these adorable characters with your family for creative play and storytelling!


Handprint Valentine's Day Cards are not only a creative and personal gesture but also a wonderful keepsake. Share them with friends, family, or that special someone to spread the love on Valentine's Day!
Creating Handprint Valentine's Day Cards is a heartwarming and personalized way to share love. Follow these simple steps to make your own special cards:

Materials Needed:
- Colored cardstock or construction paper
- Washable paint in Valentine's Day colors
- Paintbrushes
- Markers or pens
- Glue
- Decorative elements (optional, such as stickers or glitter)

Why not turn crafting into a lesson in tradition? Share the joy of sending and receiving mail. Teach the little ones how to address an envelope, adding a dash of flair with stickers and markers. The anticipation of putting up the mailbox flag and awaiting a response transforms a simple act into a joyous ritual.
Instructions:
Gather Your Materials:
Collect all the materials needed for creating Handprint Valentine's Day Cards. Choose paper in festive colors for the cards.
Fold the Cardstock:
Take the colored cardstock or construction paper and fold it in half to create the base of your card.
Prepare Paint:
Pour small amounts of washable paint onto a palette or a plate. Choose colors like red, pink, and white for a Valentine's Day theme.
Paint the Hand:
Have the person making the card dip their hand into the paint, ensuring good coverage.
Make Handprint:
Press the painted hand onto the front of the folded cardstock, leaving a handprint. This will be the centerpiece of your Valentine's Day card.
Add Personal Touches:
Allow the handprint to dry. Once dry, use markers or pens to add details like fingers, nails, and any personalized messages or drawings.
Decorate the Card:
Enhance the card's appearance by adding decorative elements. You can include stickers, glitter, or cut-out shapes from colored paper.
Write a Message:
Open the card and write a heartfelt Valentine's Day message inside. Express your love or appreciation for the recipient.
Optional Extras:
Consider adding extra touches like additional handprints, fingerprints, or footprints to create unique patterns on the card.
Let Dry Completely:
Ensure that all paint and glue are completely dry before handling or delivering the handmade Valentine's Day cards.

Remember, this magical journey of sending love through mail isn't just for the little ones; it's for everyone who believes in the power of heartfelt connections. So, whether you're eight or eighty, let the love letters flow! 💌
Just as you hold dear the memories of surprise decorations and mailbox treasures, gift generations the joy of small, warm feelings. In crafting, in mailing, in creating traditions – it's the simple things that etch memories in hearts forever.
So, let's unlock our creativity, embrace the simple joys, and make memories that stand the test of time. Because sometimes, the most priceless moments come from the simplest materials and the heart's boundless imagination.
Happy crafting!

Add comment
Comments